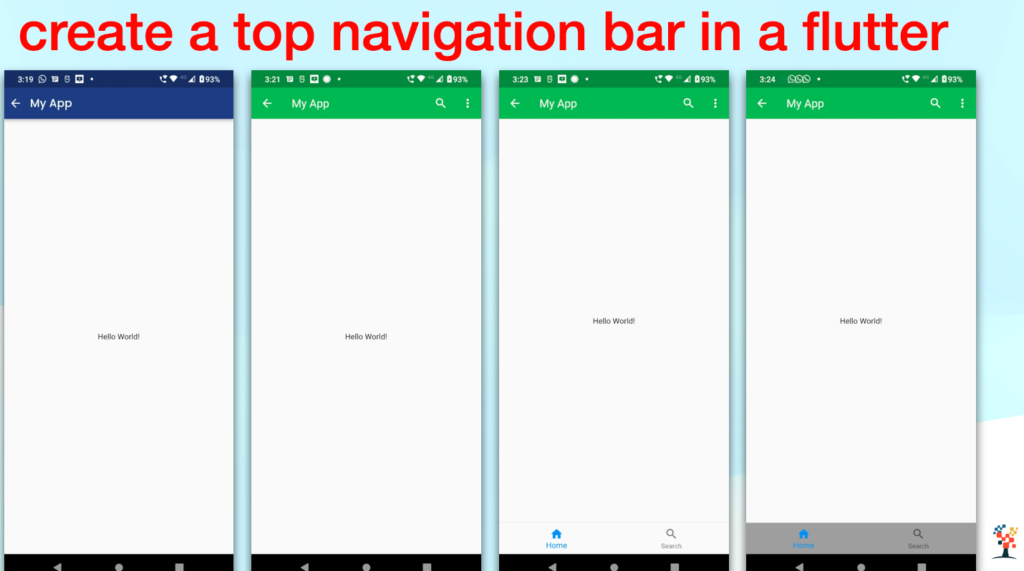
Hello developers, today I am creating a top navigation bar in Flutter, you can use the AppBar widget. The AppBar widget is typically placed at the top of the screen and contains app-related actions and navigation.
Here’s an example of how you can use the AppBar widget to create a top navigation bar in Flutter.
Let’s start
if you do not create a flutter project please go through this link.
Scaffold(
  appBar: AppBar(
    title: Text("My App"),
  ),
  body: ...
)

import 'package:flutter/material.dart';

class MyApp extends StatelessWidget {
  @override
  Widget build(BuildContext context) {
    return MaterialApp(
      home: Scaffold(
        appBar: AppBar(
          title: Text("My App"),
          leading: Icon(Icons.menu),
        ),
        body: Center(
          child: Text("Hello World!"),
        ),
      ),
    );
  }
}

        appBar: AppBar(
        title: Text("My App"),
        backgroundColor: Colors.green,

        ),
How do I customize my navigation bar flutter?
You can customize the AppBar by setting various properties such as title, background color, elevation, and actions.
You can also add a BottomNavigationBar to the Scaffold if you want to have a navigation bar at the bottom of the screen.
      appBar: AppBar(
        title: Text("My App"),
        backgroundColor: Colors.green,
        elevation: 0.0,
        actions: <Widget>[
          IconButton(
            icon: Icon(Icons.search),
            onPressed: () {},
          ),
          IconButton(
            icon: Icon(Icons.more_vert),
            onPressed: () {},
          )
        ],
      ),
How to build a bottom navigation bar in Flutter
bottomNavigationBar: BottomNavigationBar(
        items: <BottomNavigationBarItem>[
          BottomNavigationBarItem(
            icon: Icon(Icons.home),
            label: "Home",
          ),
          BottomNavigationBarItem(
            icon: Icon(Icons.search),
            label: ("Search"),
          ),
        ],
        currentIndex: 0,
        onTap: (int index) {},
      ),
Final Code
import 'package:flutter/material.dart';
class Exmaple extends StatelessWidget {
  @override
  Widget build(BuildContext context) {
    return Scaffold(
      appBar: AppBar(
        title: Text('My App'),
        centerTitle: false,
        automaticallyImplyLeading: false,
        leadingWidth: 30,
        leading: IconButton(
          icon: const Icon(Icons.arrow_back, color: Colors.white),
          onPressed: () => Navigator.of(context).pop(),
        ),


      ),
      body: Container(
        child: Center(
          child: Text("Hello World!"),
        ),
      ),
      bottomNavigationBar: BottomNavigationBar(
        items: <BottomNavigationBarItem>[
          BottomNavigationBarItem(
            icon: Icon(Icons.home),
            label: "Home",
          ),
          BottomNavigationBarItem(
            icon: Icon(Icons.search),
            label: ("Search"),
          ),
        ],
        currentIndex: 0,
        onTap: (int index) {},
      ),


    );
  }
Note: In the above example the onPressed and onTap should be replaced by the appropriate logic of your app.
In this example, the AppBar widget is placed at the top of the screen and contains the title “My App” and an icon for the menu.
You can also add actions in the app bar by using the actions property of AppBar.
Conclusion
So, in this article, we learn how to create a top and bottom navigation bar in a flutter. This above example helps your next project to bind and create fast.
So, Keep Learning!, need Support for Flutter Development?


